Individual Assignment
✅
Design and document the system integration for your final project
Table of Contents
Abbreviation

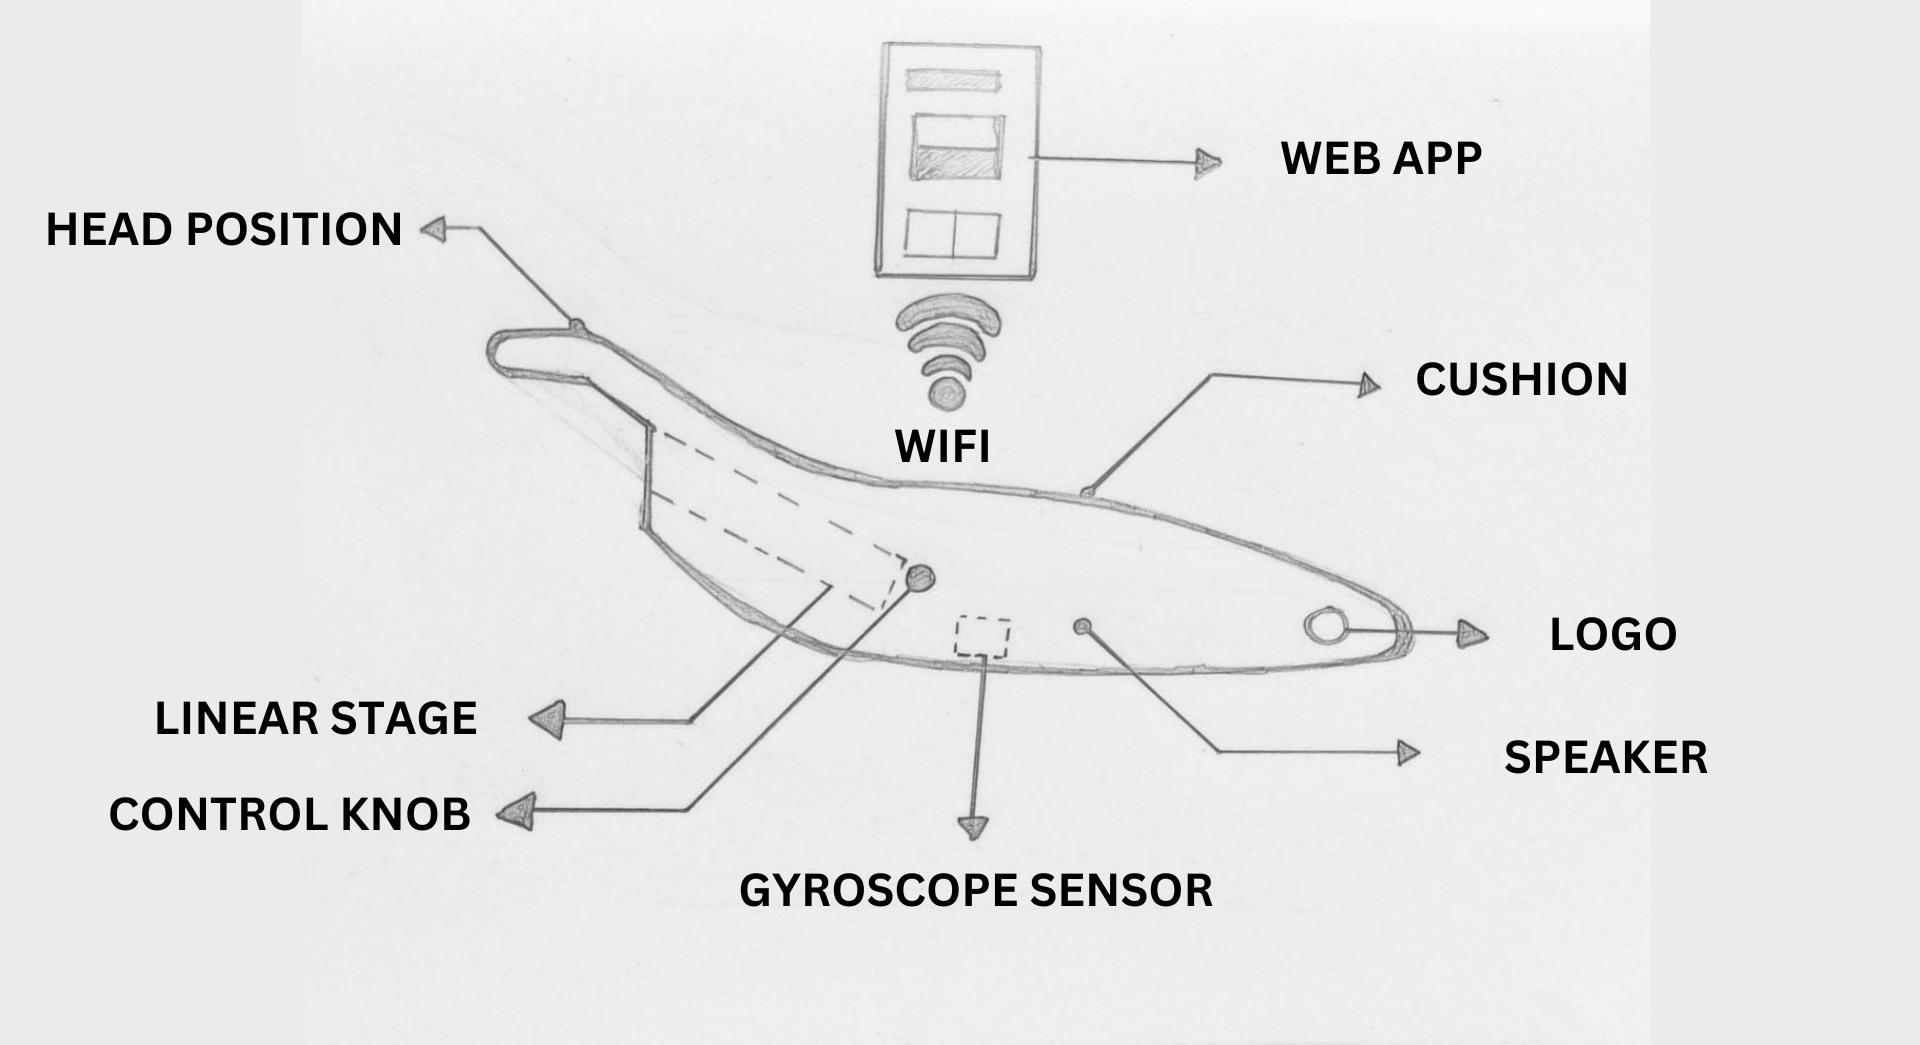
Final Project Sketch
Final Project Features
✅
DC servo mechanism controlled by servo
✅
Oscillation control knob
✅
ESP32: WIFI and Bluetooth capability
✅
User flexibility feature
✅
Stress reliefer
✅
Audio integration feature
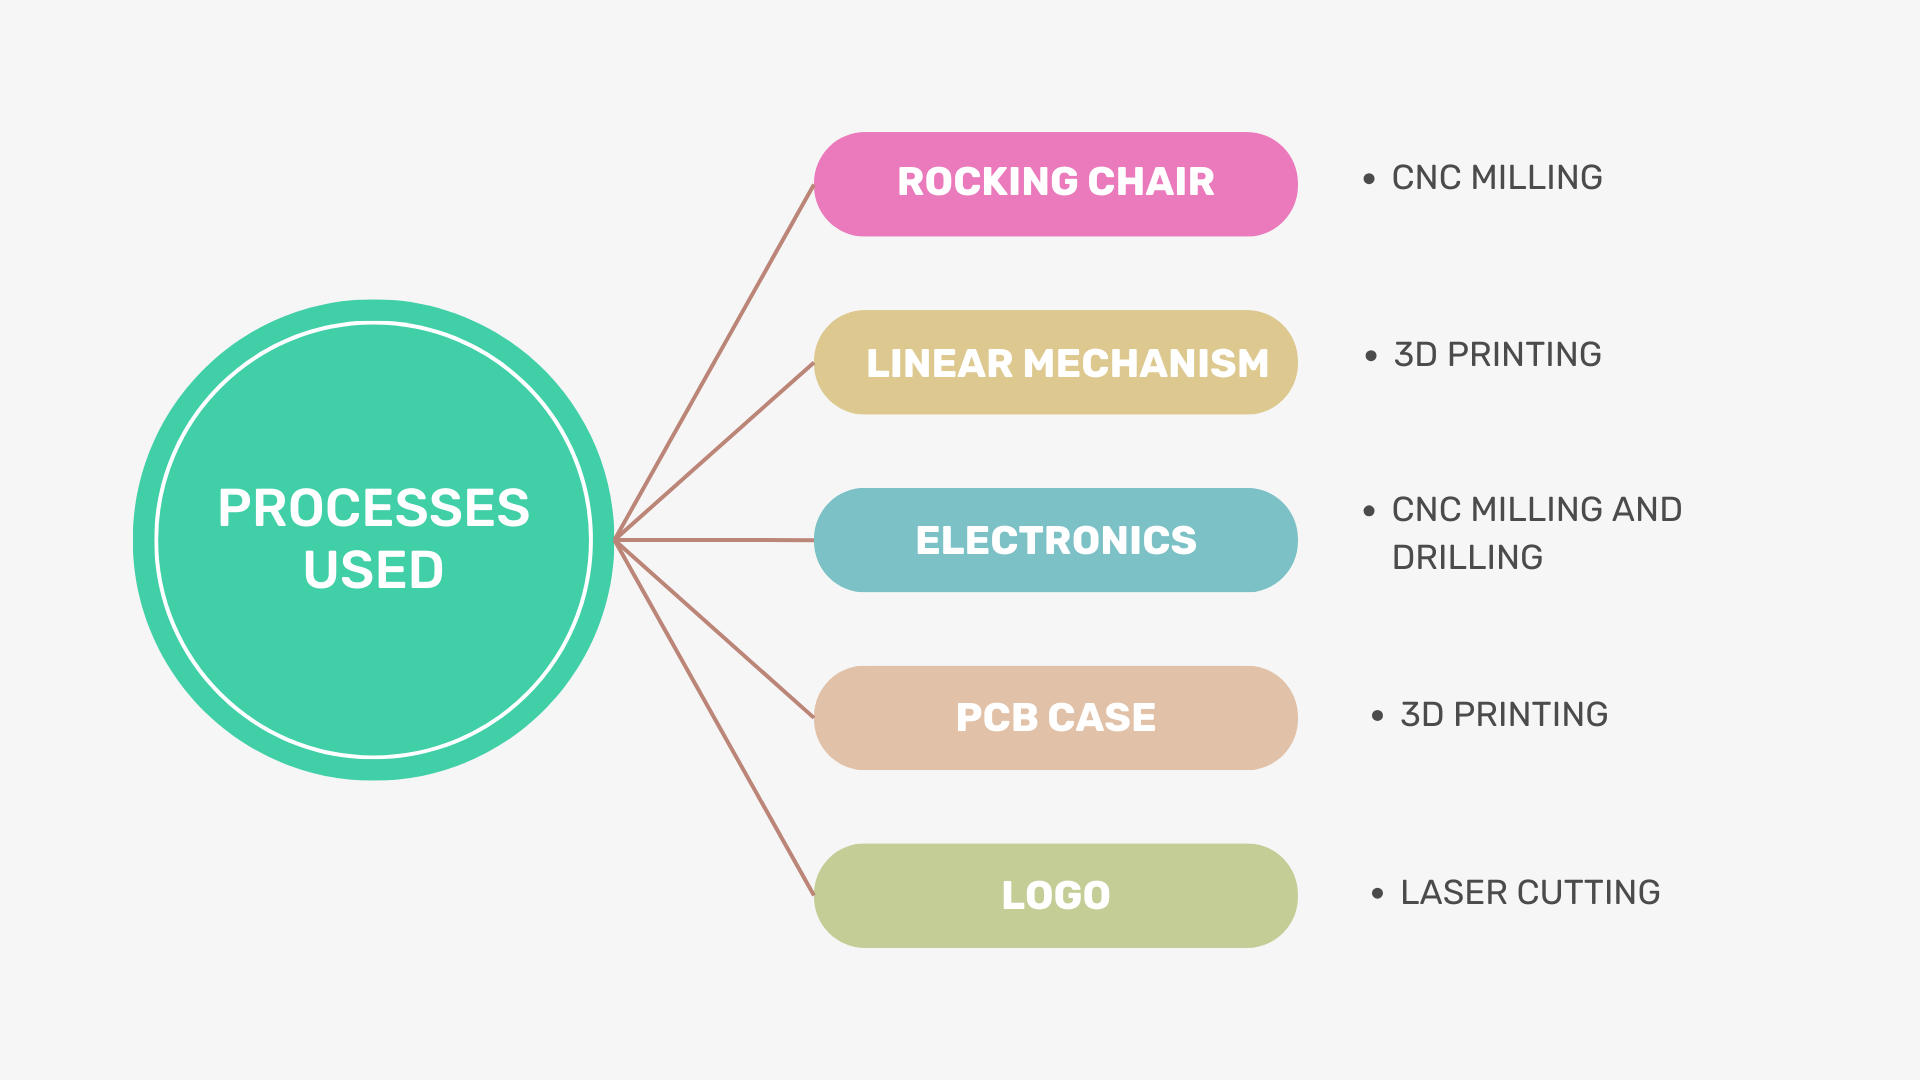
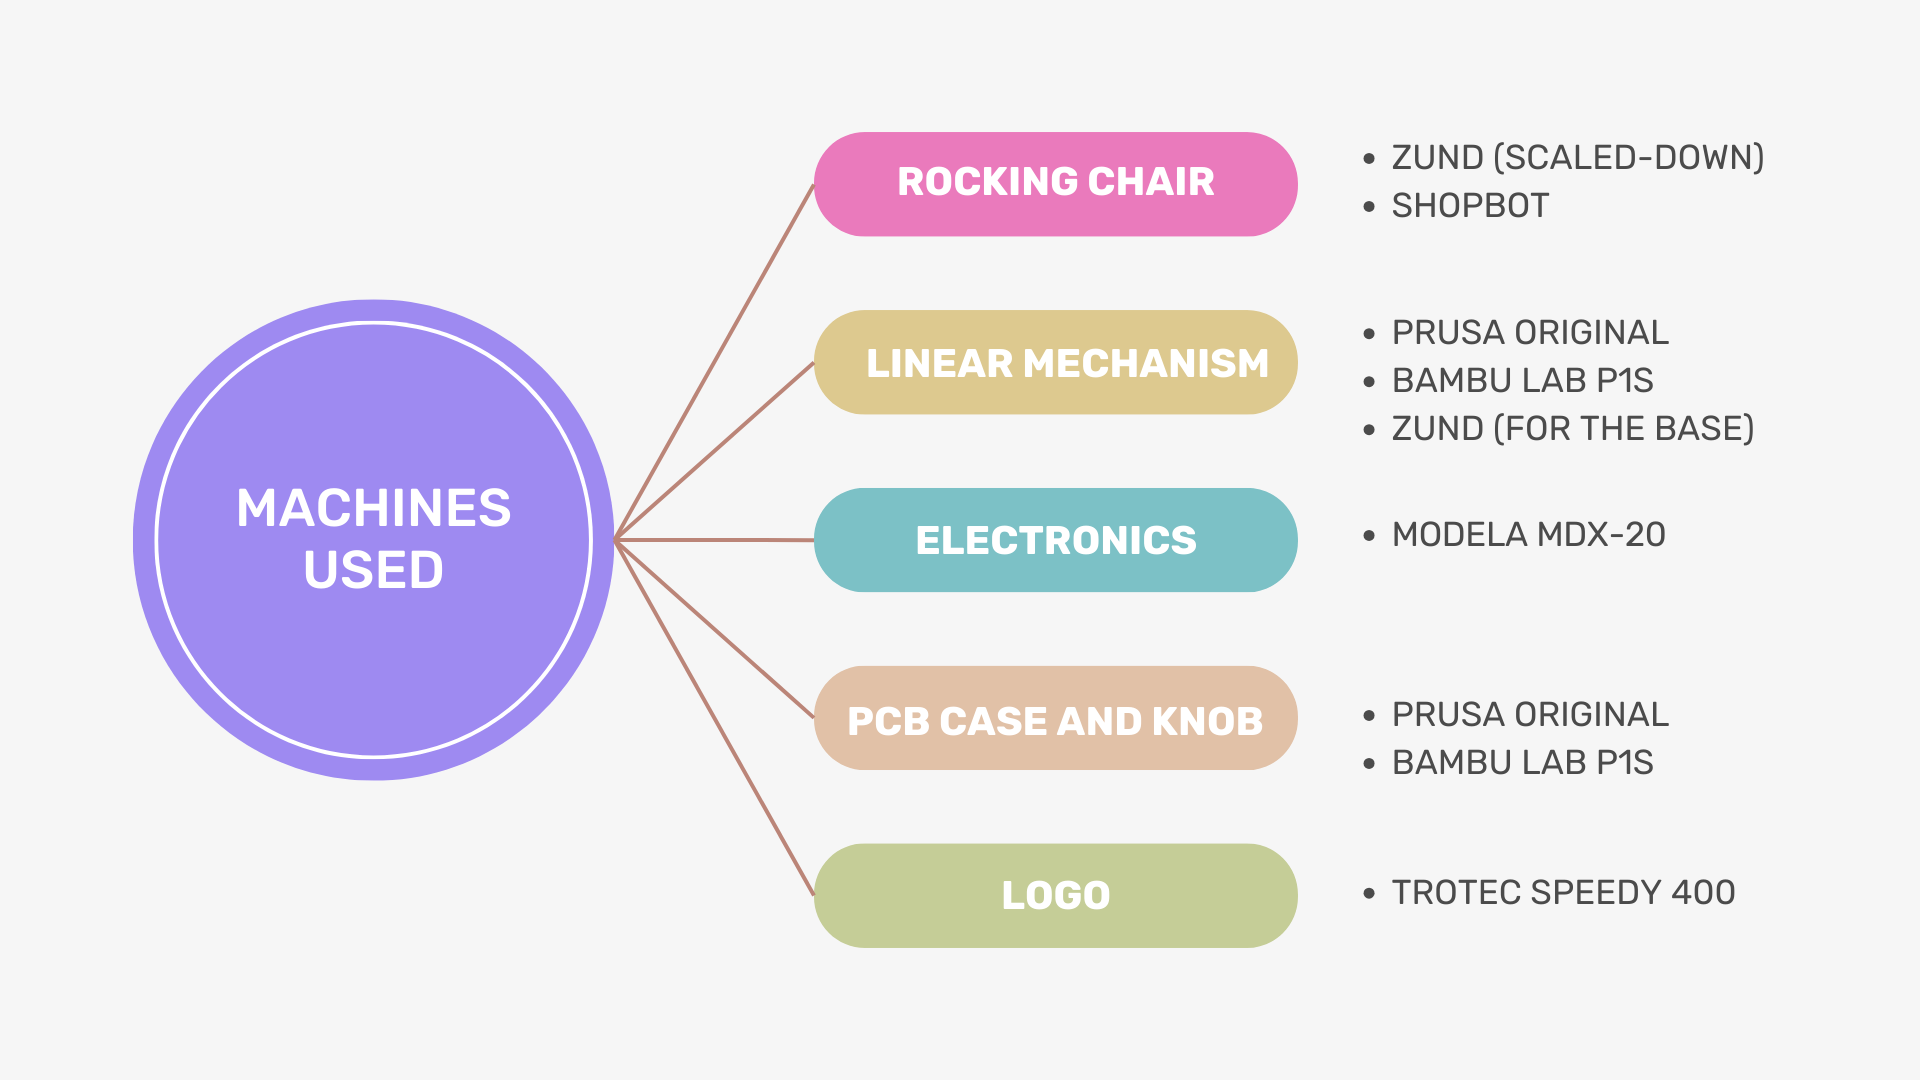
Production Method
🛤️
The image below illustrates the processes used in the final project.
🛤️
The image below illustrates the machines used in the final project.
RC Production
🏗️
Define the design and dimensions of the RC furniture.
🏗️
Create a 2D/3D model of the furniture using CAD software.
🏗️
Export the design files to a format compatible with the ShopBot.
🏗️
Use CAM software to generate toolpaths, ensuring settings are optimized for plywood cutting.
🏗️
Choose high-quality plywood sheets suitable for furniture.
🏗️
Securely fix the plywood sheets onto the ShopBot bed.
🏗️
Load the toolpath files into the ShopBot controller software.
🏗️
Execute the cutting process, monitoring the ShopBot to ensure precision and safety.
🏗️
Sand the edges of the cut pieces to remove splinters and roughness.
🏗️
Assemble the pieces.
🏗️
Inspect the completed RC furniture for any defects or adjustments needed.
3D Printing Linear Mechanism:
🏗️
Define the requirements and constraints of your linear mechanism.
🏗️
Use CAD software such as Fusion 360 to create a detailed 3D model of the mechanism, including all components such as sliders, rails, and any mounting points for motors or sensors.
🏗️
Select appropriate filament materials based on the mechanical properties needed.
🏗️
Use slicing software to convert the 3D model into a format compatible with the 3D printer.
🏗️
Print the parts using a 3D printer
🏗️
Remove any supports and smooth out rough edges using tools like sandpaper, files, or chemical treatments.
🏗️
Assemble the printed parts.
🏗️
Conduct thorough testing to ensure the mechanism meets all design requirements and performs reliably under expected operating conditions.
Electronic Circuit and PCB Production:
🏗️
Create the schematic and design the PCB using KiCad.
🏗️
Mill the PCB and solder the components.
🏗️
Test the board and upload the program.
Logo For the ARC
🏗️
Define the design and dimensions of the logo.
🏗️
Use graphic design software to create the logo design.
🏗️
Export the design to a format compatible with the Trotec Speedy 400 (DXF).
🏗️
Import the file into Trotec JobControl software, adjusting the layout for optimal material usage.
🏗️
Choose an acrylic sheet of the appropriate thickness and color for your logo.
🏗️
Execute the cutting and engraving process, monitoring the laser to ensure precision and safety.
🏗️
Carefully remove any protective film from the acrylic pieces if present.
BOM
📢
I have listed the approximate cost and quantity of the components I will be using for this project below.
Rocking Chair
| Material | Quantity | Price |
|---|---|---|
| PLYWOOD | 1 sheet | 2300 INR |
Linear Mechanism
| Components | Quantity | Price |
|---|---|---|
| ALUMINIUM EXTRUSION PROFILE | 0.5 m | 500 INR |
| ENCODER | 1 | 1000 INR |
| DC MOTOR | 1 | 33990 INR |
| MASS | 2 | 500 INR |
| BELT | 1.5 m | 200 INR |
| T-NUT | 15 | 225 INR |
| M5 BOLT | 15 | 90 INR |
| M6 BOLT | 10 | 60 INR |
PCB
| Components | Quantity | Price |
|---|---|---|
| ESP32 | 1 | 262 INR |
| MPU-6050 | 1 | 100 INR |
| POTENTIOMETER | 1 | 14 INR |
| MOTOR DRIVER | 1 | 2500 INR |
| BUZZER | 1 | 15 INR |
| RESISTOR | 10 | 20 INR |
| CAPACITOR | 6 | 18 INR |
| LED | 3 | 9 INR |
| MOSFET | 6 | 24 INR |
| VOLTAGE REGULATOR | 2 | 42 INR |
| PUSH BUTTON | 2 | 24 INR |
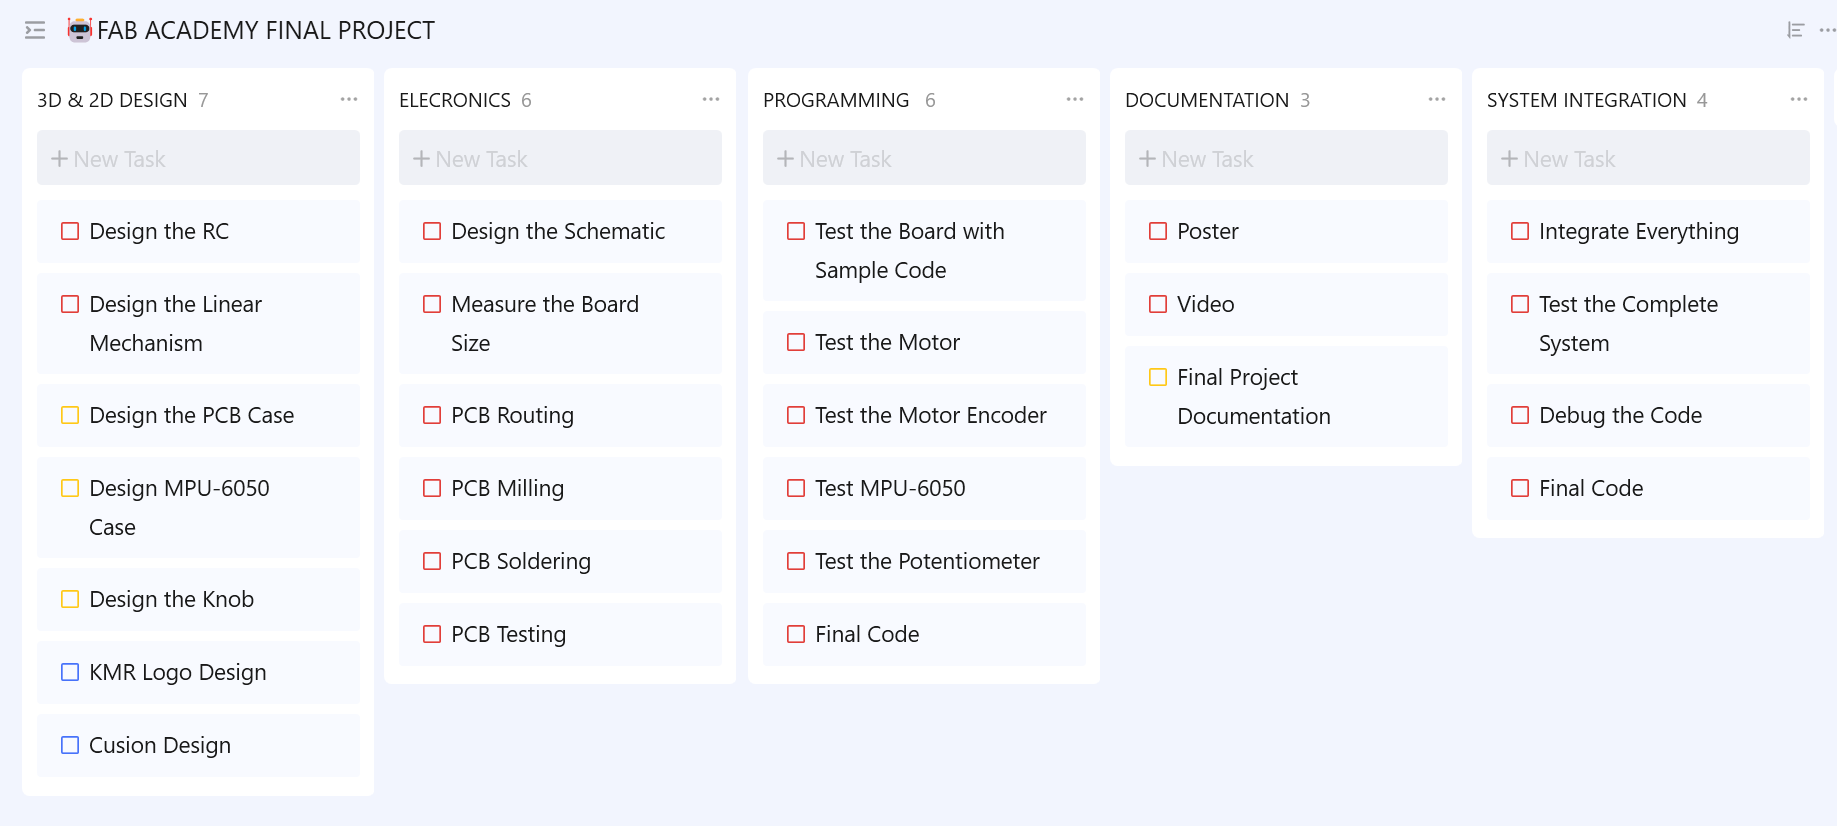
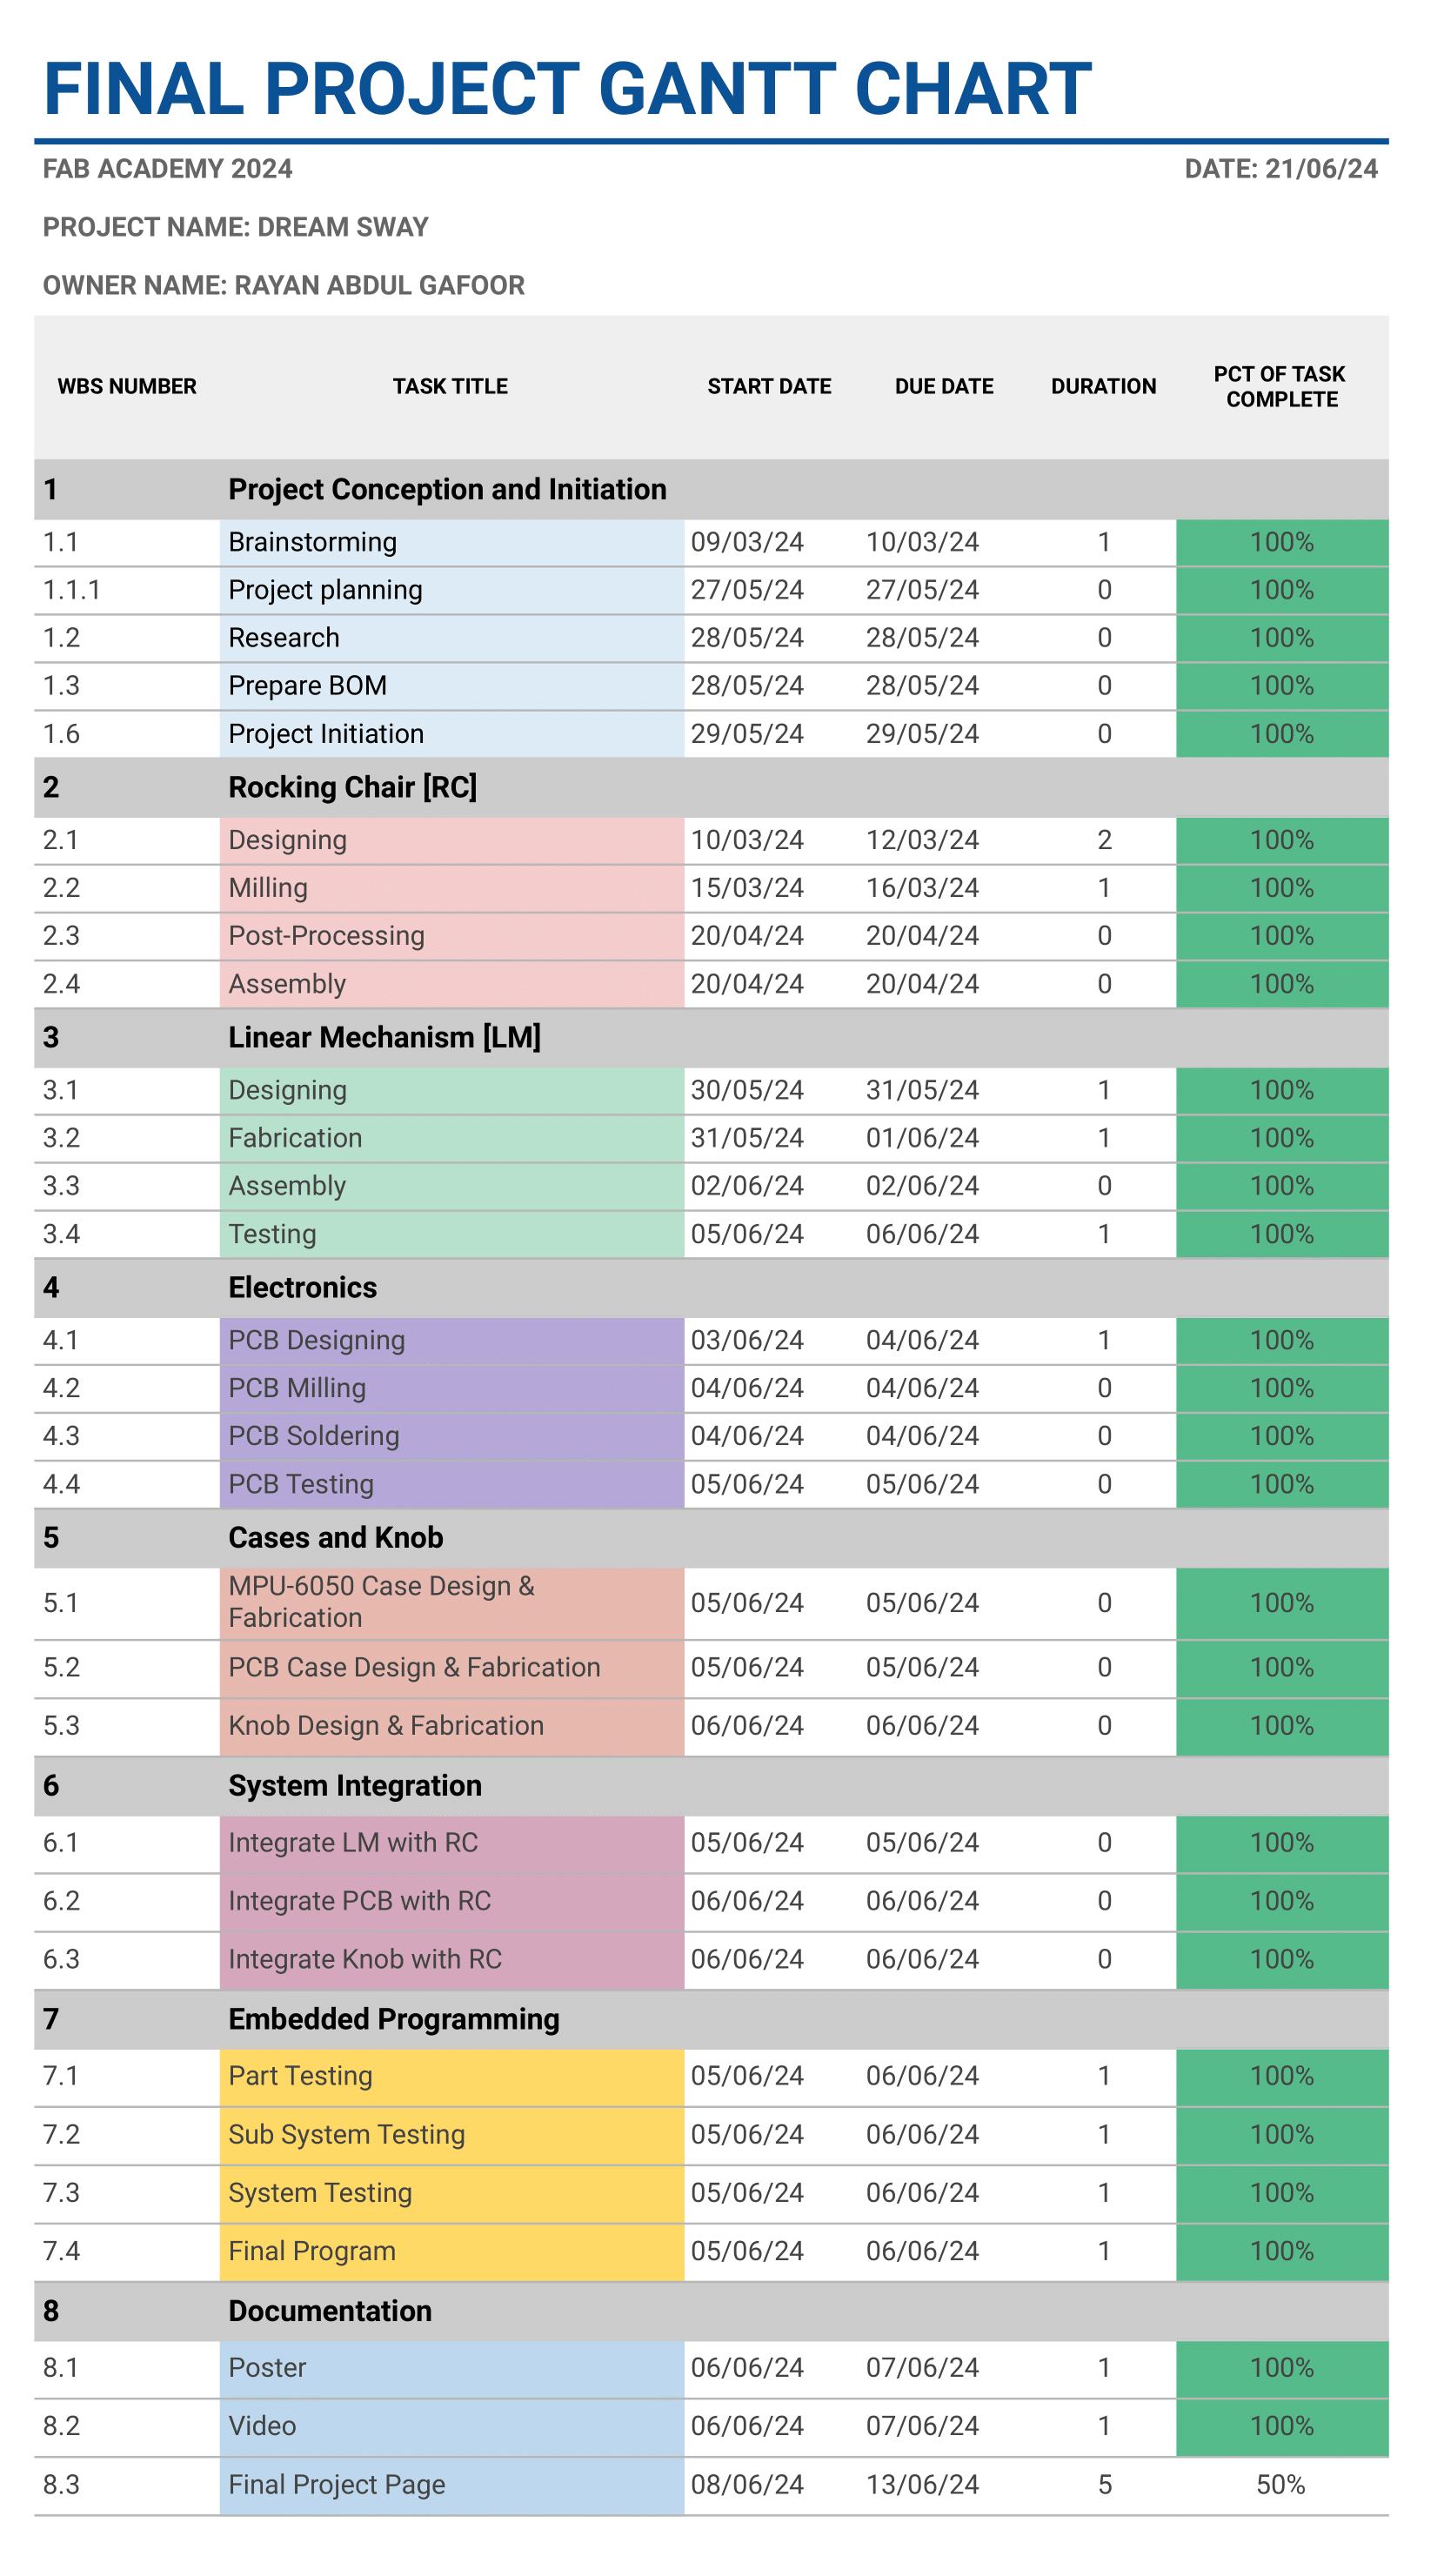
Final Project Schedule
🗓️
The Kanban chart of my final project is shown below
🗓️
The Gantt chart for my final project is shown below. After completing my final project, I prepared this Gantt chart. Due to the dengue fever, I lost 10 valuable days of my final project. I was unable to complete this task before the final project. However, I have prepared schedules and timelines in my notebook. Later, I digitalized it.
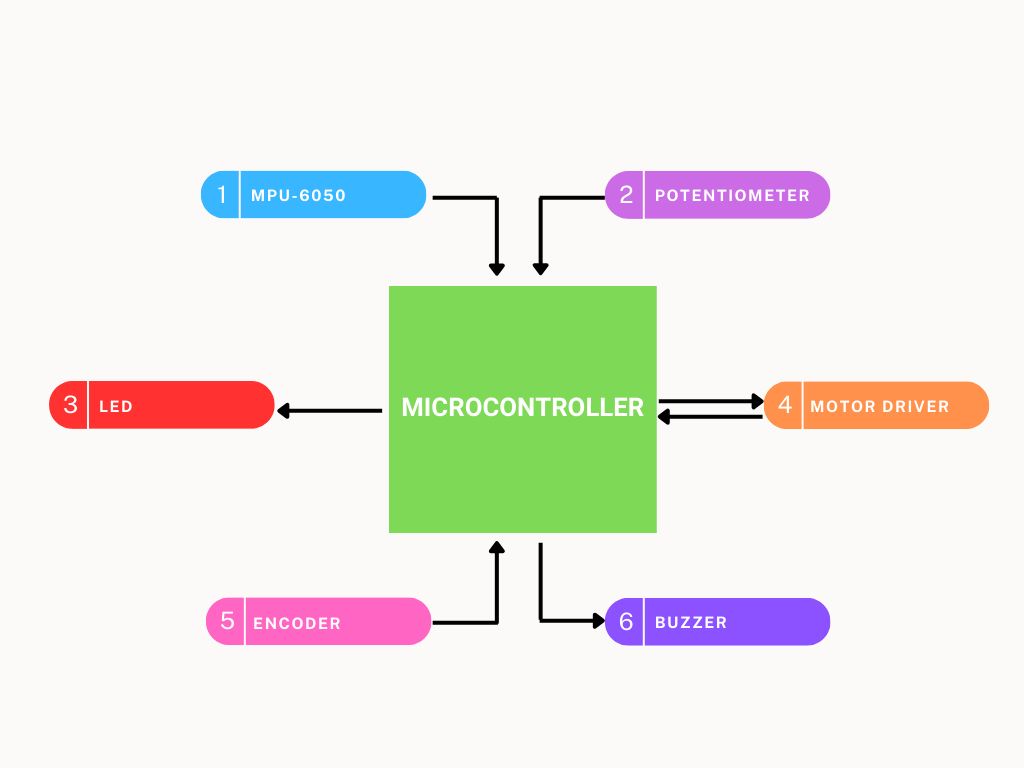
Final Project Block Diagram
🛤️
The image below illustrates the block diagram of the Dream Sway.
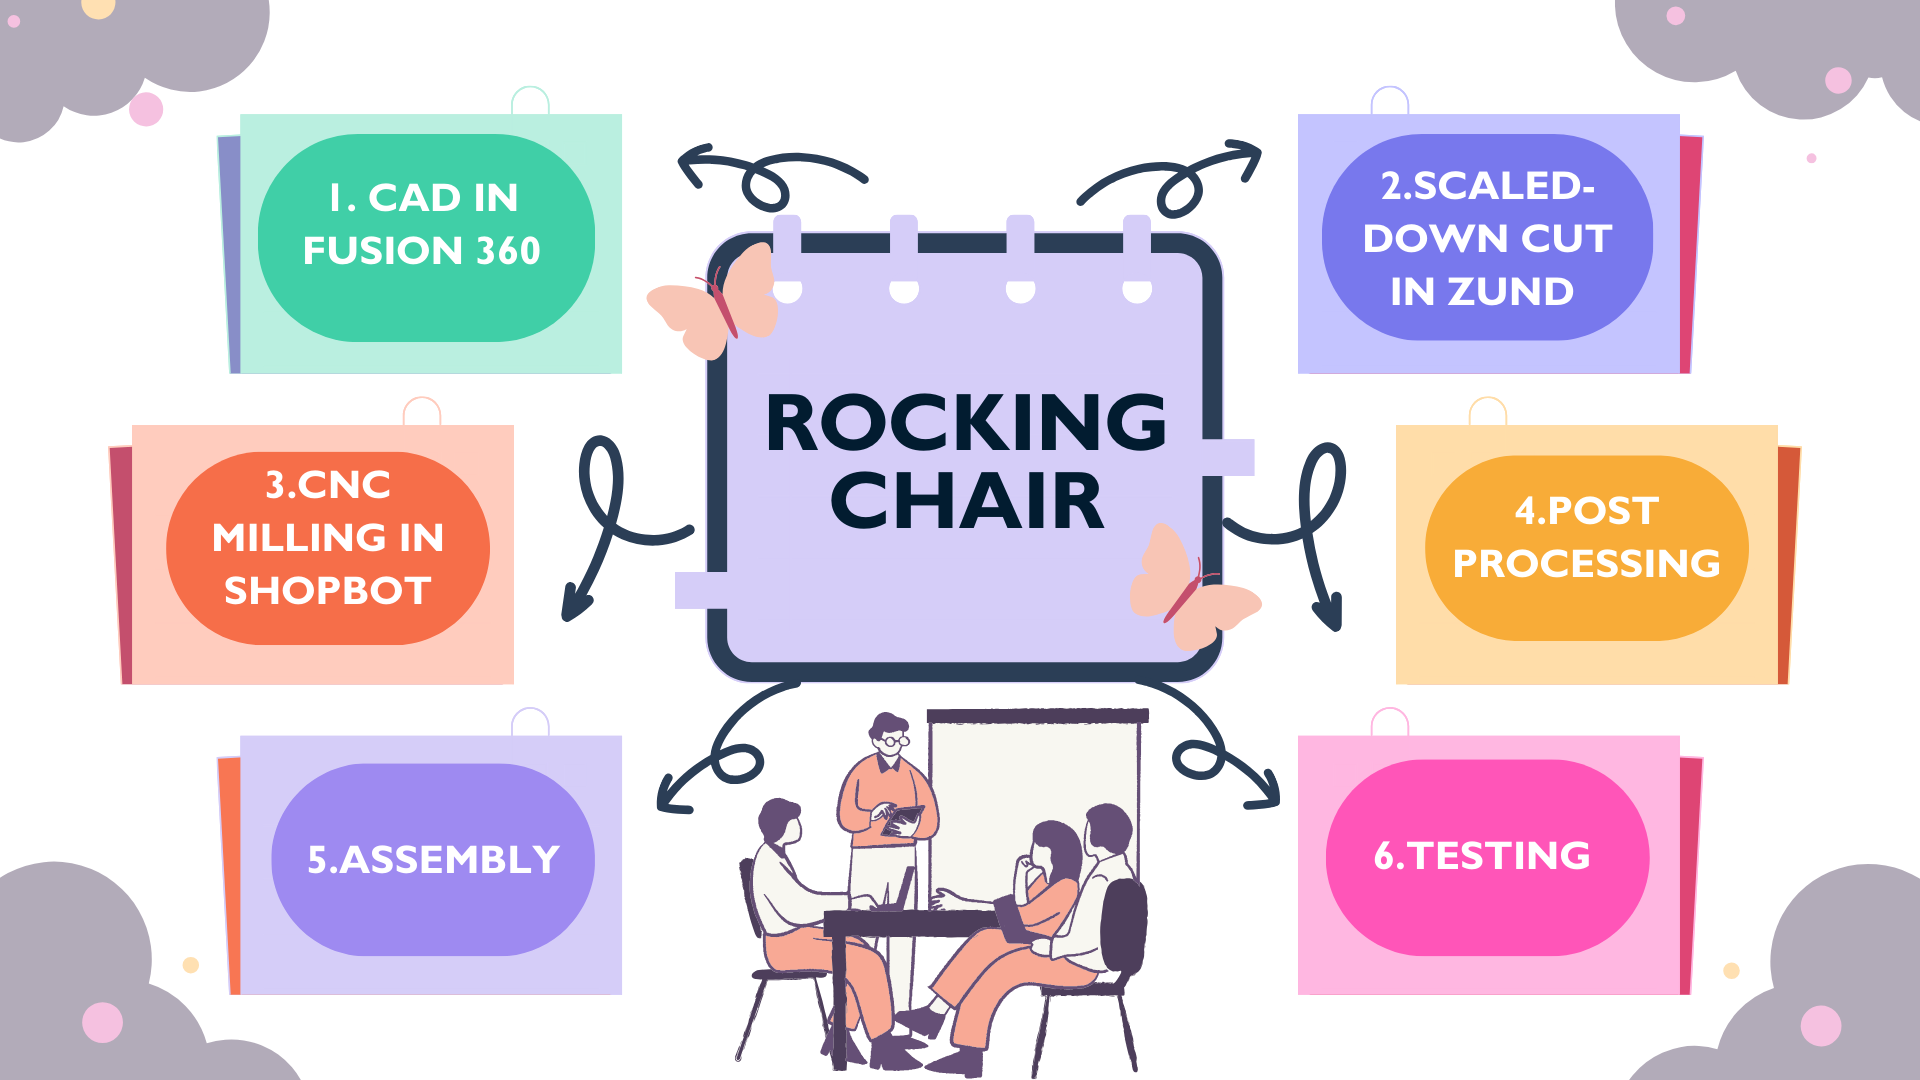
Final Project Mind Map
⏰
The image below illustrates the mind map of the Dream Sway.
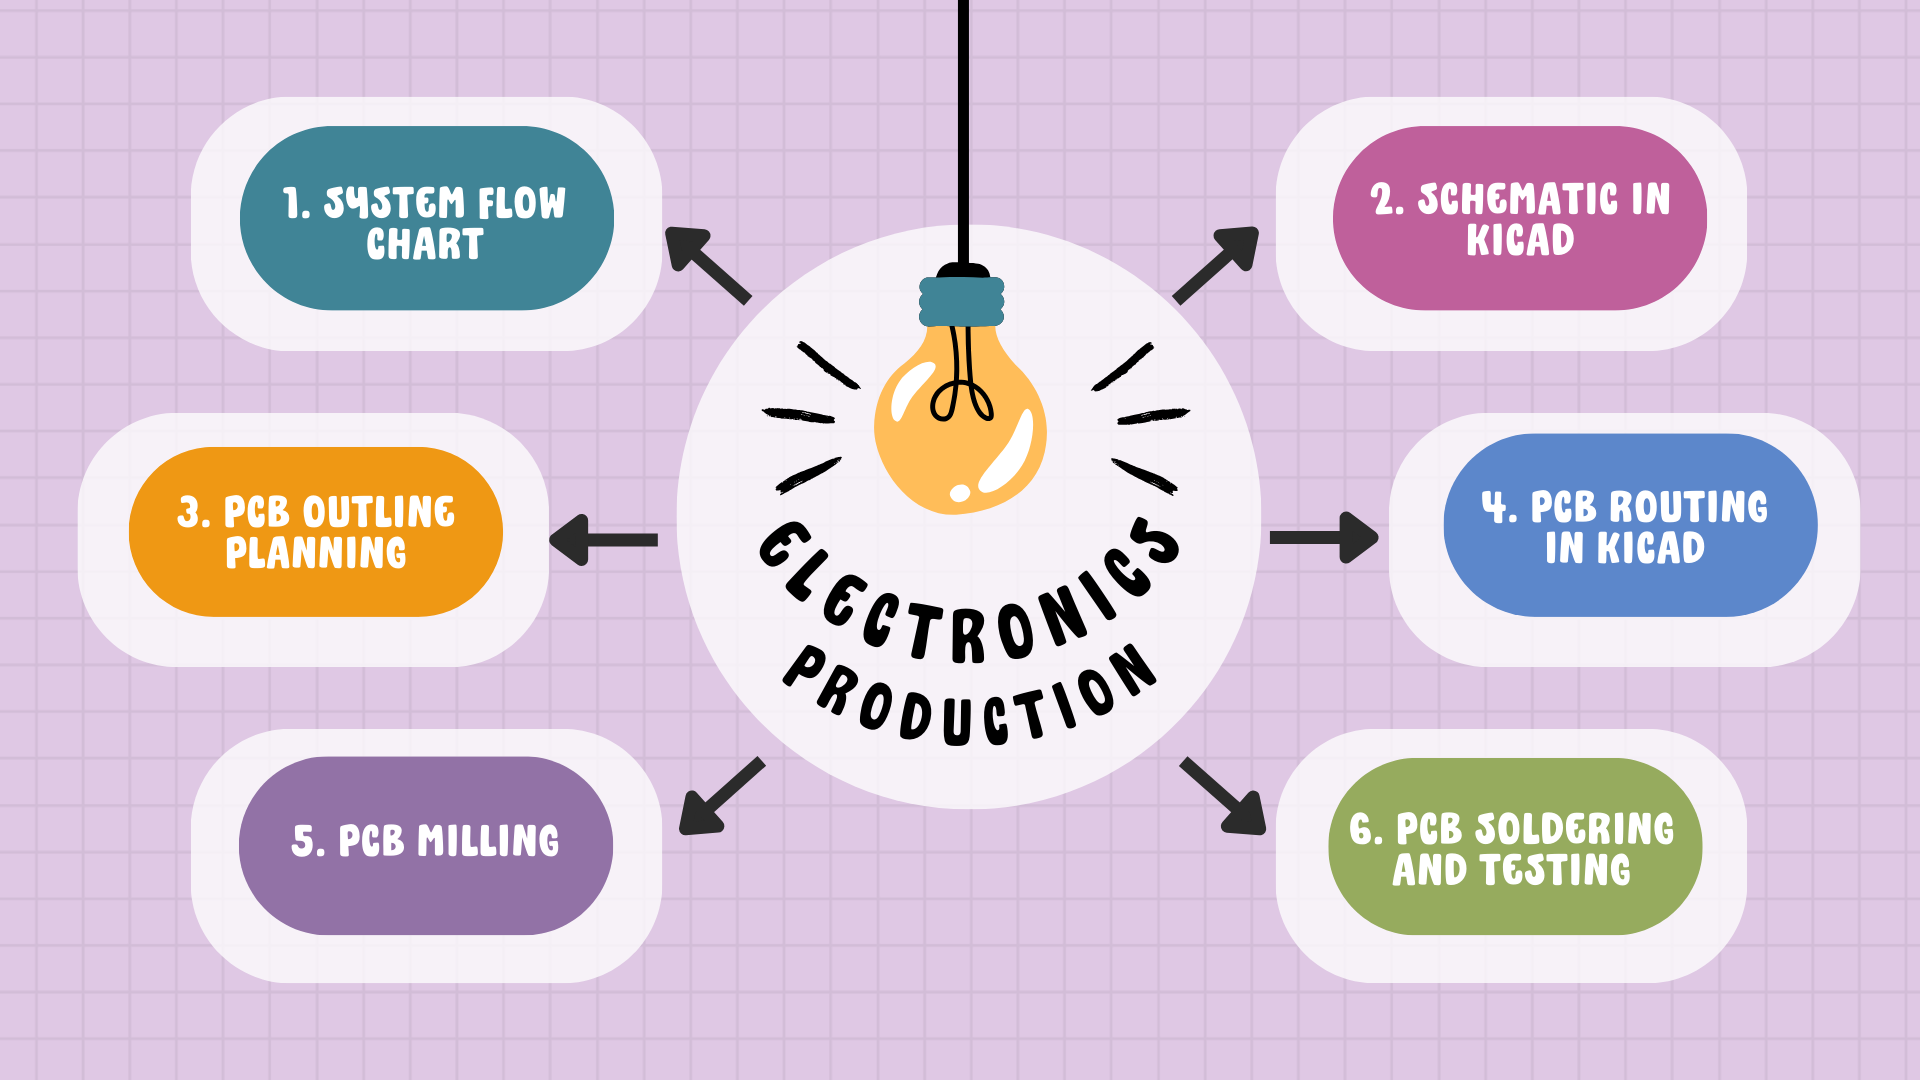
⏰
The image below illustrates the mind map of the electronics production process for my final project.
License
The work mentioned on this page is licensed under a Creative Commons Attribution-NonCommercial-ShareAlike 4.0 International License